To achieve maximum distance in the Javelin the athlete will have to balance three components - speed, technique and strength. The information on this page is for a right handed thrower.
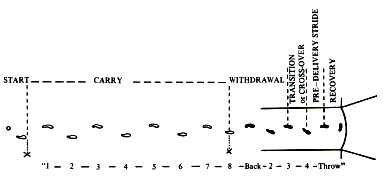
Throwing the Javelin comprises of the following phases:
|  |
Basic Technique
Please note that the diagram shows left handed thrower.
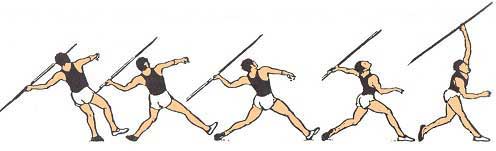
Working from left to right in the above standing throw picture sequence:
- The weight should be over the rear leg
- Hips are forward
- The feet should be in line with the throwing direction
- The throwing arm held parallel to the ground, long and relaxed with the palm uppermost
- The rear leg drives the hips to the front, transferring the weight from rear to front leg
- The arm is brought in fast and last
- The elbow should be kept high and close to the head, with the javelin being thrown over the top of the head
The Grip
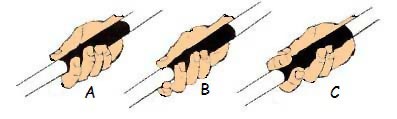
A strong, stable grip is acquired. The grip must remain firm behind the ledge made by the binding (cord), and the javelin must run down the length of the palm and not across it. The fingers, which are not secured behind the binding, must press firmly on the javelin in order to produce a natural spin at release. The 'V' grip (C) is probably the most efficient for the novice thrower as it emphasises the supporting role of the palm. Grip 'B' is the one used by most experienced throwers.
Start and Carry
The aim is to carry the javelin to allow the muscles of the right shoulder, arm and wrist to relax and also to allow an easy running action.
- Stand with right foot forward
- Carry the javelin above the shoulders or head
- Right elbow points forward
- Palm of the right hand points at the sky so as to provide a platform for the javelin to sit in
- Javelin points in the direction of the run up - point slightly down
Approach Run
Experienced throwers will use an approach run of 13 to 17 strides - inexperienced throwers will use fewer strides.
- Run on the balls of the feet with hips high
- Free arm to swing more across the body
- Carrying arm to flex to maintain carry position of the javelin
- Speed to match athlete's physical and technical abilities
Withdrawal
The aim is to ensure the withdrawal movement does not affect the athlete's momentum. A checkmark can be used to indicate start of the withdrawal phase that commences with the right foot and lasts for two strides.
- At the checkmark the athlete accelerates ahead of the javelin rather than physically pushing the shoulders and javelin back
- Head remains facing in the direction of throw
- Maintain hips at right angles to the direction of running
- Drive the right leg forwards and upwards to help maintain the correct position of the hips
Transition
The aim of the transition phase, also known as the cross-over is to place the right foot ahead of the athlete's centre of gravity so as to produce the characteristic lean back. This must be achieved by advancing the right foot forward and not by leaning back.
- Right foot remains close to the ground to maintain forward momentum
- Right heel makes contact with the ground
- As the right foot is advanced forward the left foot is advanced ahead of the vertical axis so as to be in place ready for a quick plant after the right foot has landed - the trunk is inclined backward at an angle of about 115° to the forward horizontal direction
- The cross over phase ends when the right foot makes contact with the ground and the left leg is forward in the air
Pre delivery stride
- The left leg reaches forward
- Shoulders & hips now in line with the direction of throw
- The athlete waits for the ground to come up and meet the left foot
- Trunk is upright
- Head facing direction of throw
- Shoulders and javelin parallel
- Throwing hand above the level of the shoulder
Delivery
- Following contact of the left foot with the ground the left side must brace against a thrusting right leg action
- Right leg drives upwards and forwards bringing the hips at 90° to the direction of throw
- Hip thrust is followed with the shoulders and chest turning square to the front and lining up with the hips and bringing the elbow of the throwing arm forward
- The throwing shoulder is brought over the left leg
- The left leg should lift as the athlete rides over it and the throwing arm now comes into play
- Arm strikes fast with the elbow high and close to the mid line
- The release angle (angle between the horizontal and the javelin) for the javelin has to take into consideration aerodynamic lift and drag.
Recovery
The left foot remains grounded and the right leg is brought past it to halt the athlete. The amount of space needed to stop before the scratch line depends on the amount of horizontal momentum. This is typically 1.5 to 2 metres. Adjustment of the checkmark is required to achieve optimum distance on the runway.
Skill Drills
Running activities without the Javelin
- At a steady speed
- With acceleration
- Sideways
- With repeated crossovers
- Crossovers mixed with normal running
- Over low obstacles between each stride
Running activities with the Javelin
- At a steady speed
- With acceleration
- With repeated crossovers
- Crossovers mixed with normal running
- Over low obstacles between each stride
- With repeated withdrawals
Throwing drills can also be performed using a medicine ball, Javelin or sling ball
Optimum Release Angle
With ballistics, the same initial speed is applied to the projectile regardless of the angle of projection. Research (Bartonietz 1995)[2] has shown that the athlete cannot throw at the same speed for all angles of projection, as the angle increase so the speed decreases. This decrease in speed is a result of two factors:
- As the angle increases the athlete must expend more energy in overcoming the weight of the javelin and so less effort is available to develop the release speed of the javelin
- The structure of the body favours a throw in the horizontal direction
Each athlete has a unique combination of release velocity and release angle that depends on their size, strength, and throwing technique which means that each athlete has their own specific optimum release angle.
Each athlete has a unique combination of release velocity and release angle that depends on their size, strength, and throwing technique which means that each athlete has their own specific optimum release angle. Bartonietz (2000)[1] identifies that the optimum release angle for a world-class javelin thrower may be 33°± 7°.
Specifications
The weight specification for the javelin depends on gender and age.
| Gender\Age | 11-12 | 13-14 | 15-16 | 17-19 | 20-34 |
| Male | 400 grms | 600 grms | 700 grms | 800 grms | 800 grms |
| Female | 400 grms | 500 grms* | 500 grms* | 600 grms | 600 grms |
* British Athletics changes of implements for 2014
| Gender\Age | 35-49 | 50-59 | 60-69 | 70-79 | 80+ |
| Male | 800 grms | 700 grms | 600 grms | 500 grms | 400 grms |
| Female | 600 grms | 500 grms | 400 grms | 400 grms | 400 grms |
Training Programs
A training program has to be developed to meet the individual needs of the athlete and take into consideration many factors: gender, age, strengths, weaknesses, objectives, training facilities etc. As all athletes have different needs a single program suitable for all athletes is not possible.
No comments:
Post a Comment